Benchmark
Overview
The benchmark tool provides a quick workflow to apply standardised asset and connection metadata across multiple projects.
The user can allocate projects as benchmark projects and populate metadata to all required assets and connections. This benchmark metadata can then be automatically applied to other projects through the benchmark interface to speed up project builds and ensure metadata consistency across projects.
Benchmark project setup
Access to the benchmark module can be set up by the FutureOn development team. Benchmark integration settings can be found within Admin Settings under the Integrations tab. The information tab gives you general information on the benchmark integration set up.
Under the settings tab, the user can add an API token (API tokens can be created within Account Settings. See the FieldTwin Account Settings documentation under the API tokens section for more details). Paste the token into the API token field found in Account settings > Integrations > Name of benchmark integration e.g. Benchmarks > Settings tab. Projects under this API token marked as benchmark projects will be listed below.

Allocating a FieldTwin project a benchmark project status is done within the project settings, where a tab will be shown with the name of the users’ benchmark integration. In this example it is named “Benchmarks”. Under this tab, check the tick-box to confirm that this project contains benchmark data. Multiple projects can be assigned as benchmark projects.

Assigning benchmarking data within a benchmark project
The benchmark interface tab can be found under the project layout drop down . All assets and connections contained within the project that are eligible for benchmark metadata will be displayed here, categorized by asset structure or connection type. Only staged assets and connections can be assigned benchmark metadata (the asset must already exist within the FieldTwin project but does not need to be in the correct geometric location).

To mark a staged asset or connection as having benchmark metadata, add a tag under the Properties > Common tab, that starts with “benchmark”. Multiple benchmark tags can be created per asset or connection, for example different tags per equipment type e.g. benchmark_manifold or global tags across multiple asset types e.g. benchmark_2025. Populated metadata associated with these assets will then be marked as benchmark data that can be assigned to the same asset types within other projects.
Populating benchmark asset metadata within non-benchmark projects
The benchmark panel can be found under the Layout drop down.
All available benchmark project names and benchmark tags will be shown in the “Available Benchmarks” drop down in the format of “project name” > “benchmark tag”. Staged asset and connection types that have available benchmark metadata are shown below, categorised by asset and connection type.

Benchmark metadata can be populated globally using either the “Apply selected benchmark to all” option, or by individual asset and connection types using the object specific benchmark tag dropdown then clicking the “Apply selected benchmark” option.
The benchmark metadata will then be updated for all assets and connections with the associated benchmark tags.
To update the benchmark metadata, update the metadata within the benchmark project and then repeat the process of applying selected benchmarks. Updates to metadata within benchmark projects will not be automatically applied to other projects.
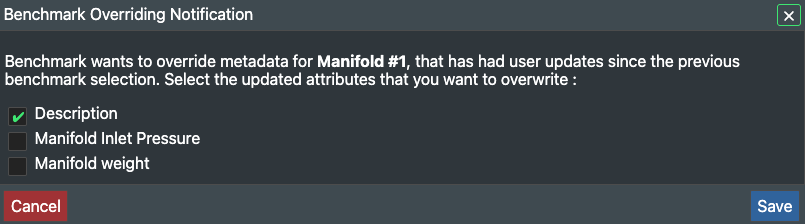
If any attributes have been updated since the previous benchmark population, a pop-up will appear showing which attributes have been updated and an option to select which to overwrite. This enables the user to update benchmark data selectively.