FieldTwin Intelligence
Description
FieldTwin Intelligence is an AI-powered conversational assistant integrated into the FieldTwin platform that enables users to interact with their FieldTwin projects through natural language. Users can query project data, create and update assets, search documentation, generate charts and exports, and more - all via a chat interface embedded inside the FieldTwin Designer.
The integration consists of two parts: the FieldTwin Intelligence Admin panel for account administrators and the FieldTwin Intelligence User chat interface accessible to the project users.
Architecture
- Powered by Large Language Model (LLM) and implementing Retrieval-Augmented Generation (RAG) and Autogen Agents using LangGraph.
- MCP Support (Model Context Protocol) that enables sharing our FieldTwin tools and vector stores e.g. access FT Intelligence inside MS Excel.
MCP Integration
FieldTwin Intelligence supports Model Context Protocol (MCP) integration, enabling you to access FieldTwin's comprehensive documentation and API resources directly within external AI platforms and development environments.
Available Platforms:
- OpenAI AgentKit/AgentBuilder
- Microsoft Copilot Studio
- GitHub Copilot in VS Code
- Cursor IDE
MCP Tools:
getApiDocs- Access FieldTwin API documentationgetGuides- Access FieldTwin user guides and visual documentation
For detailed setup instructions and platform-specific integration guides, see the MCP Integration Documentation.
Release Notes
The latest release notes for version 3.0 released on April 8th, 2026.
Installation
In FieldTwin Admin, go to Account Settings, then Integrations, and click Create New Tab. Set the following values:
Name:                           FieldTwin Intelligence
URL:                            https://fieldtwin-intelligence-frontenduser.TBD/
Account Settings URL:           https://fieldtwin-intelligence-frontendadmin.TBD/
Use GET verb:                   yes
Do not pass arguments in URL:   yes
Tab Display Position:           Module Panel (default)
Configuration
In FieldTwin Admin, go to Account Settings, then Integrations, FieldTwin Intelligence (or the name you entered in the installation above) and click Settings.
FieldTwin Intelligence Admin
From this section, the user is able to configure the integration settings, manage example prompts and upload account-level documents for AI processing.
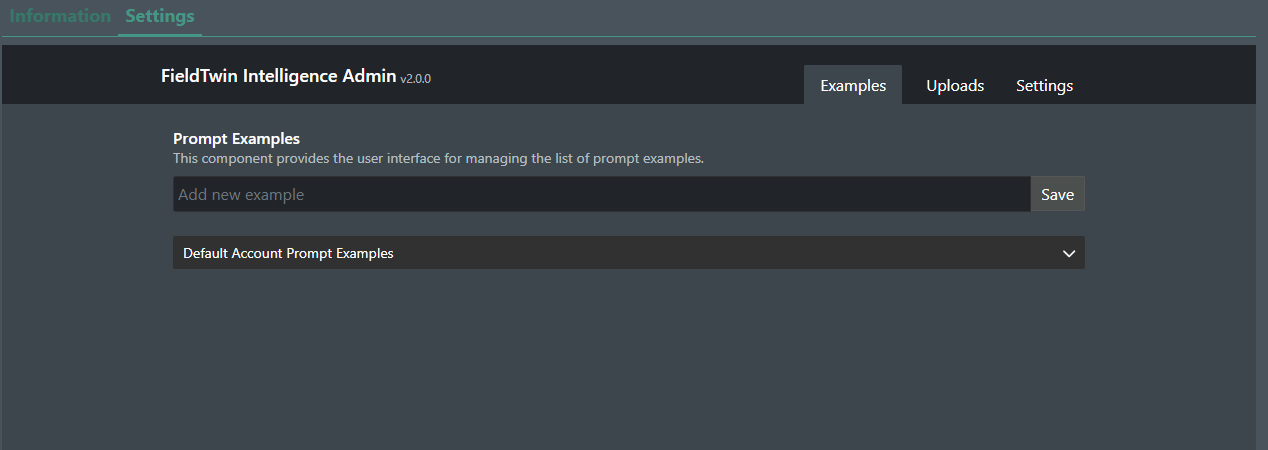
The admin interface has three tabs accessible from the header navigation bar:
- Examples - Manage example prompts shown to users.
- Uploads - Upload and process documents for the AI knowledge base.
- Settings - Configure integration access settings.
Examples tab
The Examples tab allows the account administrator to create, edit and delete example prompts. These prompts are displayed in the user interface to help users get started with the integration.
Adding a new prompt
To add a new example prompt, type the prompt text in the input field at the top and click the "Save" button or press Enter.

The newly added prompt will appear below the input field section.

The following actions will be visible on the far right of each custom prompt:
 - Update the prompt.
 - Delete the prompt.
Editing a prompt
Clicking ![]() will allow the instructions in the previously saved prompt to be modified.
will allow the instructions in the previously saved prompt to be modified.

The following actions will be visible on the far right:
 - Saves the changes made.
 - Discards the changes.
Deleting a prompt
To delete a prompt from the list, click the ![]() icon next to it. The following confirmation popup will appear:
icon next to it. The following confirmation popup will appear:
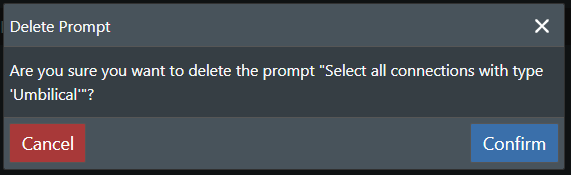
Select Confirm to delete the prompt.
Additional prompts
At the bottom of the page, a collapsible section will be visible, containing all built-in default system prompts:
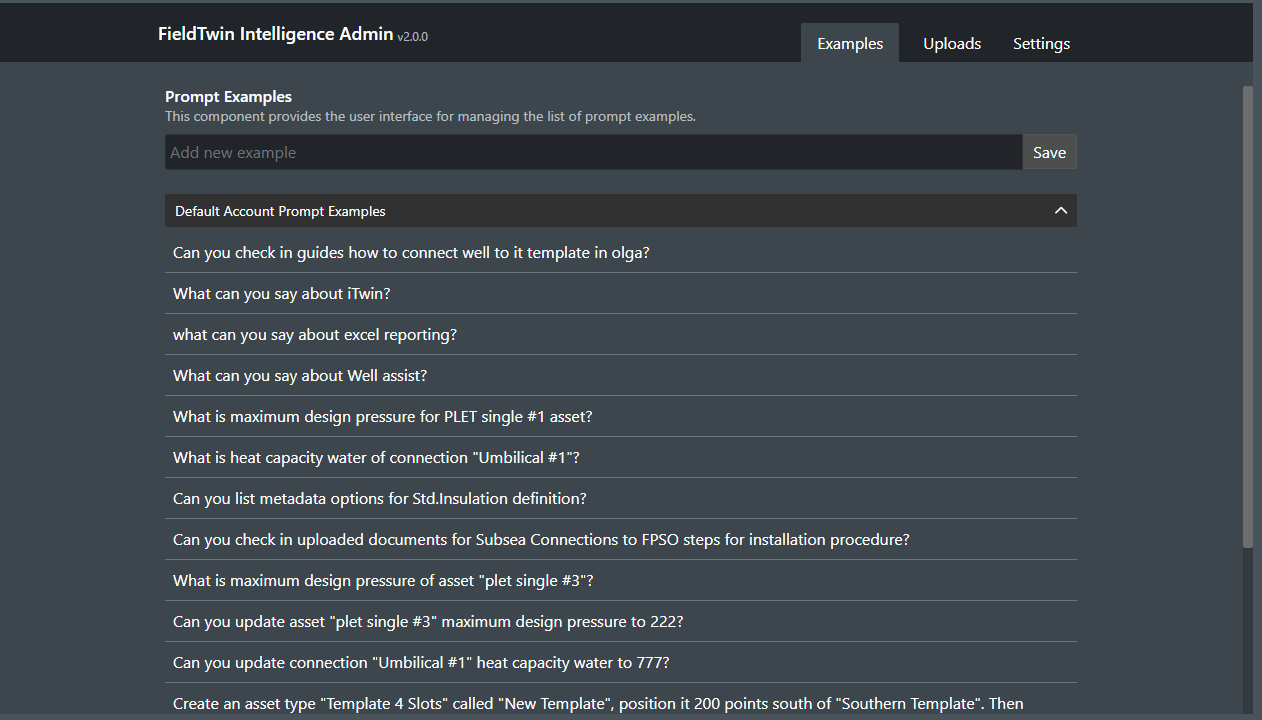
If the current account is linked to another Parent account, any custom prompt examples from the Parent account will be inherited, and listed in a separate dropdown accordion:

Note: Default and Parent prompt examples are Read-only and cannot be edited or deleted.
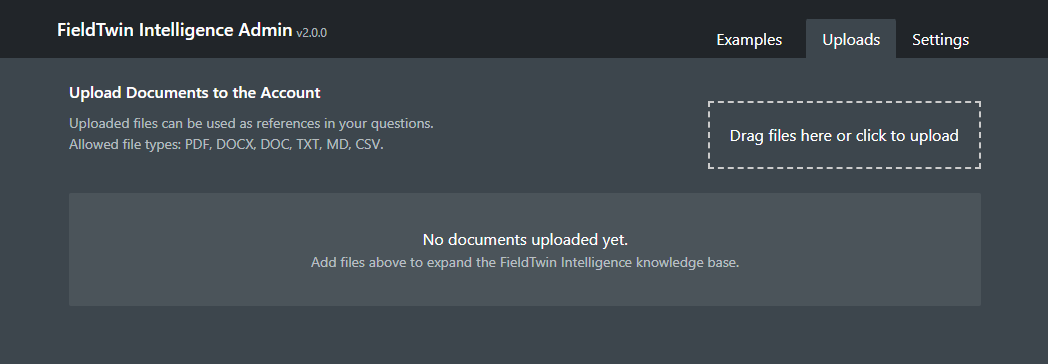
Uploads tab
The Uploads tab allows extra documents to be added in order to be used as reference by the AI model for broader context.
The uploads happen on account-level meaning that once processed, each document will be accessible across all account projects.
The following file-types are supported: PDF, DOCX, DOC, TXT, MD, CSV Maximum file size: 100 MB.
Uploading documents
Documents can be uploaded either by clicking on the file upload zone or by dragging and dropping the files to it.

Note: All uploaded documents must have unique names.
Once uploaded, the documents will appear in a table below the upload section:
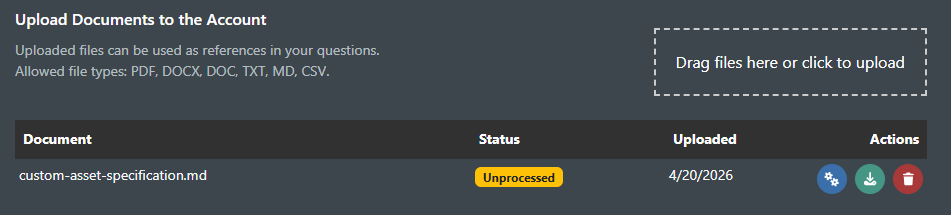
The uploaded documents table has the following columns:
- Document - The name of the uploaded document.
- Status - The current status of the document.
- Uploaded - The date on which the document was uploaded.
- Actions - Actions relating to the specific document.
Each uploaded document has the following actions available:
 - Process the document. This will include the content of the file to the context of the AI assistant.
 - Download the document to your device.
- - Delete the file and remove it from the context of the AI assistant.
When uploading a document, if one with the same name already exists, the following popup will appear:
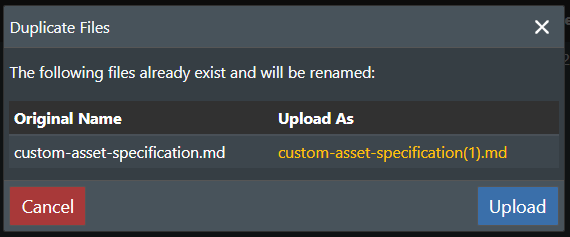
- Original Name - The detected duplicate name.
- Upload As - The new name that will be assigned to the document.
Clicking on the Upload button will automatically rename the document to what is shown in the Upload as column, and will save it with the new name.
Processing documents
By default after being uploaded, documents will have a "Unprocessed" status badge.
![]()
There are four processing statuses:
- Unprocessed - The document has not been processed.
- Processing - The document is being processed.
- Ready - The document has been processed successfully.
- Failed to process - The document failed to be processed.
Note: A document is available to the AI assistant only if it's with status Ready.
Clicking the ![]() button will start the processing of the document, and change it's status to "Processing...". Once completed the status will be set to Ready, which will make the content of the document available to the AI assistant.
button will start the processing of the document, and change it's status to "Processing...". Once completed the status will be set to Ready, which will make the content of the document available to the AI assistant.

If processing fails, a "Failed to process" status badge will be shown.
Deleting documents
To delete a document, click the ![]() icon next to it. The following confirmation popup will appear:
icon next to it. The following confirmation popup will appear:
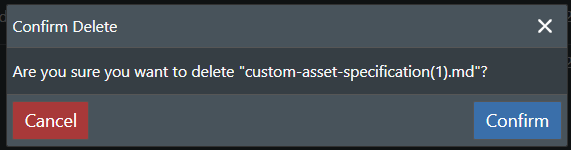
Clicking on Confirm will delete the document.
Settings
Clicking on the Settings tab will show a new screen:

The following integration settings are able to be modified:
- Allow FieldTwin Intelligence to make changes to your Project - controls whether the AI assistant can preform write operations (creating, updating, or deleting project objects). When disabled, the integration operates in Read-only mode.
FieldTwin Intelligence User
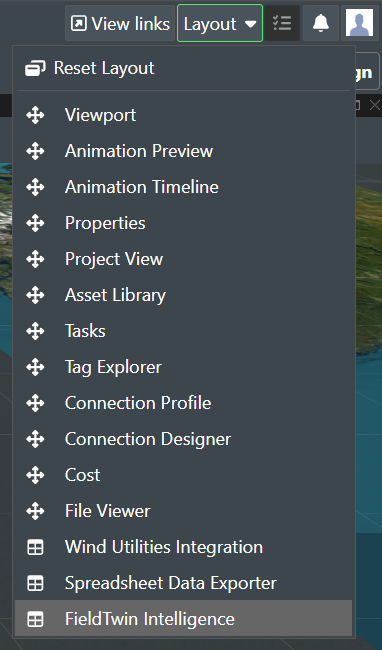
The FieldTwin Intelligence User interface can be accessed through FieldTwin Designer.
To do so, click on "Layout", then "FieldTwin Intelligence" or however you have named the integration in the admin part.
Overall view
This is how the FieldTwin Intelligence User interface looks like.
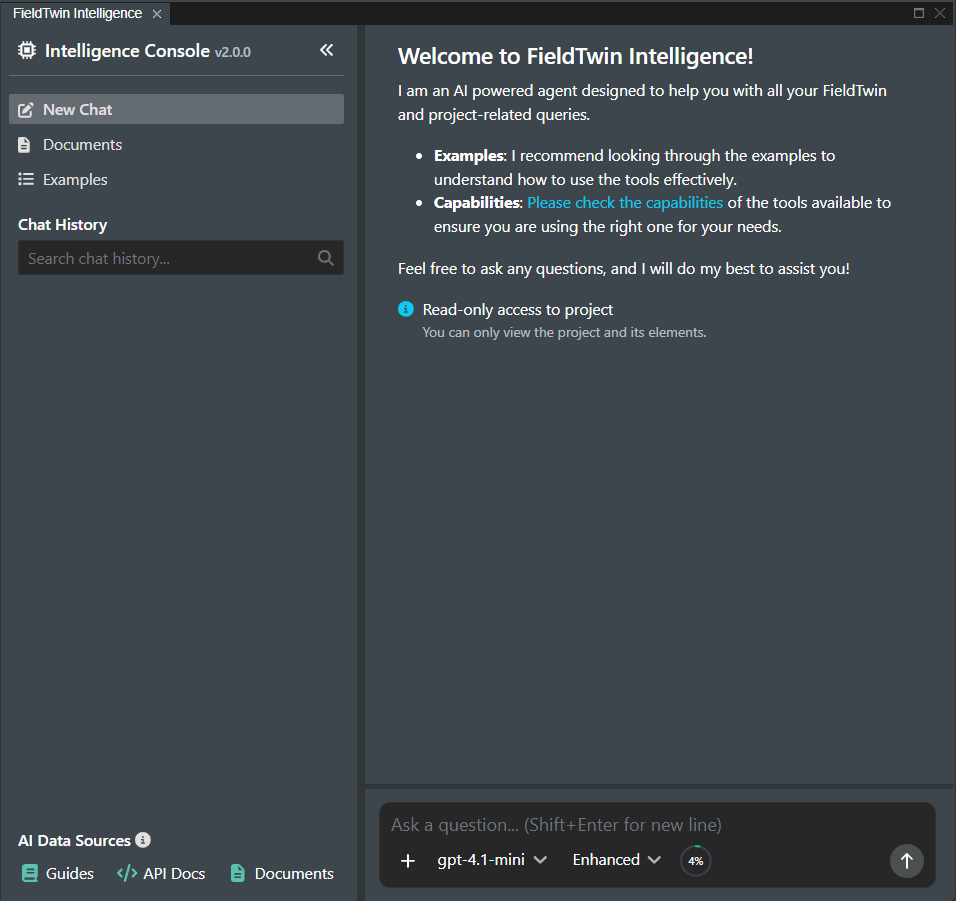
The interface is split into two resizable panes:
- Sidebar (left) - Containing the chat history, navigation and AI data source status.
- Main content (right) - The main active view.
Sidebar section
Visible at the top is the integration title with the current version number.
Note: Clicking the title also starts a new chat.
Next to the title is a collapse button allowing the sidebar to be shrunken to an icon-only view.
![]()
Clicking the integration icon at the top will expand the sidebar back to its original size.
![]()
Navigation bar
Below the header are three navigation buttons:
- New Chat - Starts a new conversation.
- Documents - Opens the document uploads view.
- Examples - Opens the example prompts view.
The Documents and Examples pages have an extra ![]() button visible at the top right. It allows the lists to be updated if new documents or examples have been added to the administration part of the integration (or were uploaded to an asset).
button visible at the top right. It allows the lists to be updated if new documents or examples have been added to the administration part of the integration (or were uploaded to an asset).
Documents page
The Documents view allows you to upload and manage project-level documents that the AI assistant can use as context.
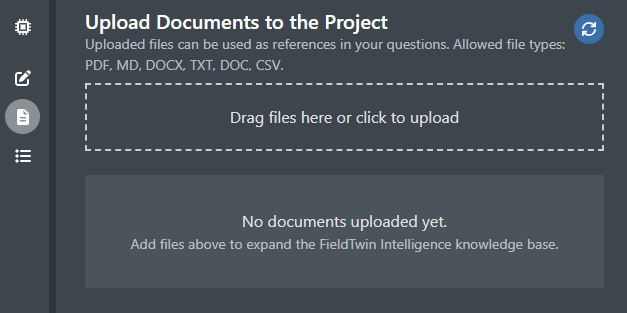
Documents can be uploaded either by clicking on the file upload zone or by dragging and dropping the files to it.
Supported file types: PDF, DOCX, DOC, TXT, MD, CSV.
Maximum file size: 100 MB.
Note: The content and behavior of this page is similar to the Uploads tab found in the Admin part of the integration.
Additional details regarding the tables and statuses can be found there.
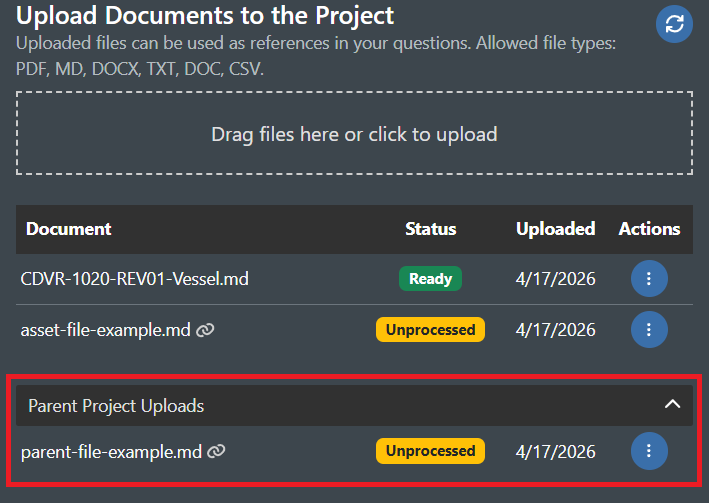
Documents table
The uploaded documents will be shown in a table:

Each document has the following actions accessible from the '...' dropdown menu:
- Process - Includes the content of the file to the context of the AI assistant.
- Summarize - The assistant is asked to summarize the content of the selected file.
- Download - Downloads the file to the users device.
- Delete - Removes the document after confirmation.
In addition to the manually uploaded ones, all documents uploaded to an asset (located within the FieldTwin viewport) will be listed in the table as well.
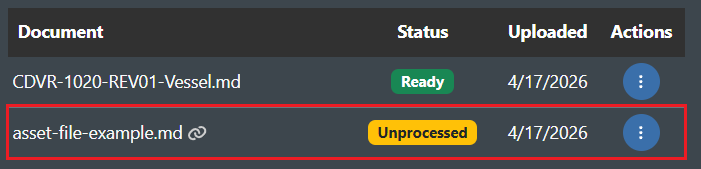
Such documents are indicated with a  icon next to their name.
Two extra actions are present for such linked documents:
- Locate - Locates the asset in the FieldTwin viewport which is the owner of the document.
- Exclude/Re-Include - Select whether the document is included in the context of the AI assistant. Excluded documents are not usable by the AI.
If the current project is linked to a parent project with uploaded documents, they are shown in a separate collapsible section.
These documents are read-only and can only be downloaded from the actions '...' menu.
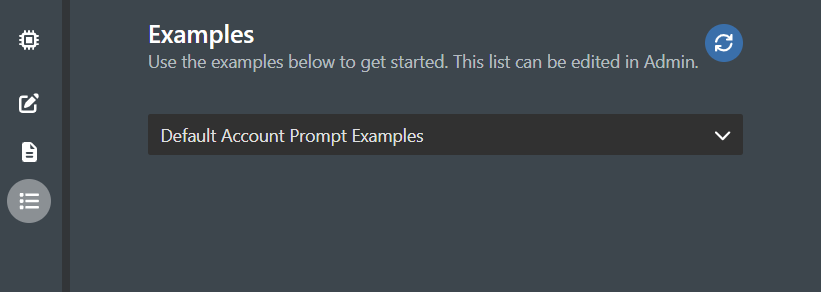
Examples page
The Examples view shows a collection of example prompts to help you get started.
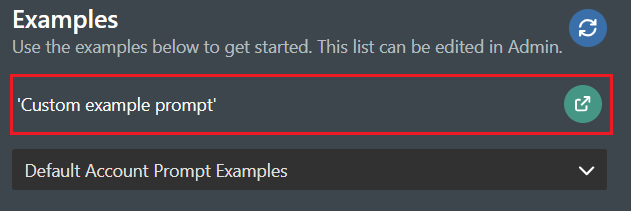
Any custom prompts created from the Examples tab in the Admin will be displayed here:
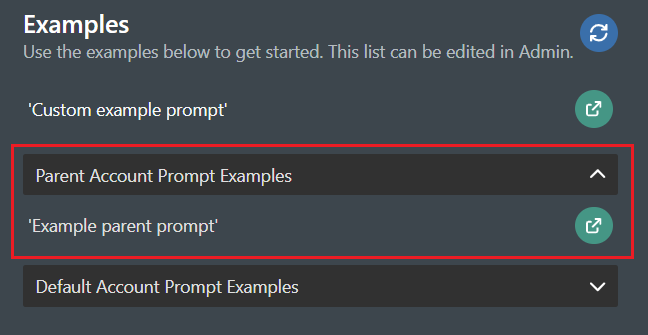
If the account is linked to another parent account, the custom prompts from the parent will be inherited and visualised in a separate collapsible accordion:
All prompt examples have the same action available - ![]()
Clicking the icon will start a new chat with the selected prompt.
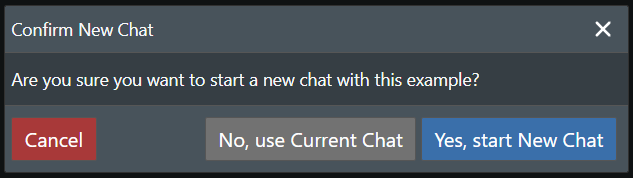
If an active chat already has messages, a confirmation dialog will appear asking whether to start a new chat or use the current one:
Note: If no custom prompts are present or inherited, only the default Built-in system prompts accordion will be visible.
Chat history
The chat history section displays a list of all previous conversations for the current project.
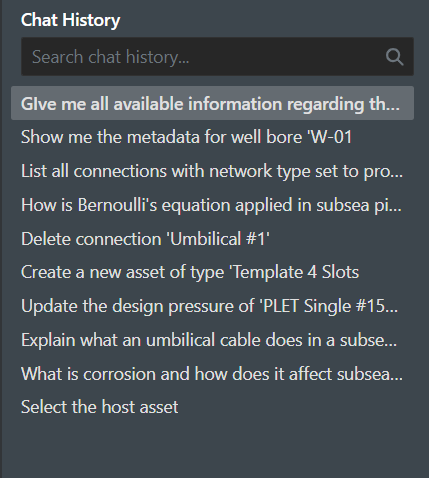
The search bar at the top allows filtering conversations by name or content.
Clicking on a conversation loads it in the main content area and allows the user to proceed the conversation.
Hovering over a conversation shows an "..." button which opens a context menu:
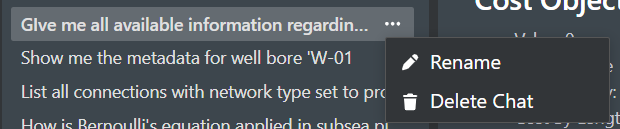
The following options are available:
- Rename - Allows editing the conversation name.
- Delete - Removes the conversation after confirmation.
AI Data Sources
At the bottom of the sidebar, this section visualises the three available AI knowledge bases.
These are vector knowledge bases used by the AI assistant to answer your questions.

Each data source adds different information to the context of the AI assistant:
- Guides - FieldTwin user guide documentation.
- API Docs - FieldTwin API reference documentation.
- Documents - Uploaded project and account documents.
In addition, the integration also manages two data sources automatically:
- Project - Current project data (assets, connections, wells, metadata).
- Account - Account-level definitions and configurations.
The AI searches these sources to provide accurate, context-aware responses about your FieldTwin project.
The current status of each of the data sources is indicated by it's color indicator:
 - Data is up-to-date. Hovering over the source will visualize a tooltip showing when it was last updated.
 - Data is missing or stale. Clicking the icon will trigger an update.
 - An update is in progress.
Chat section
The Chat view is the main interface for interacting with the AI assistant.

New chat view
At the top of every new chat is a welcome message with links to example prompts and a list of capabilities.
An access level indicator shows whether the integration has full or read-only access to the project.
 Full access to project - The AI can read and write project data.
 Read-only access to project - The AI can only read and query data.
Chat input
The chat input area at the bottom is where you type questions and instructions for the AI assistant.

Visible at the bottom section of the input field are the following actions and menus (left to right):
- Add Context
- Model selector
- Agent mode selector
- Monthly usage indicator
- Send question
Add Context
Clicking the ![]() button opens a two-level menu for browsing available documents and tools by category.
button opens a two-level menu for browsing available documents and tools by category.

Each type offers different context for the assistant:
- Documents - Reference an uploaded document to include its content as context.
- Tools - Reference a specific AI tool to guide the assistant toward using it.
Once selected, the document or tool name will be included to the chat prompt and highlighted in either orange (for document) or blue (for tool):

Note: The attached documents and tools can be removed by deleting them from the input field.
For details and information regarding all available Tools and usage examples, see the Tool Capabilities Guide
For quicker and easier access, typing # in the input opens an autocomplete dropdown listing all of the available or documents.
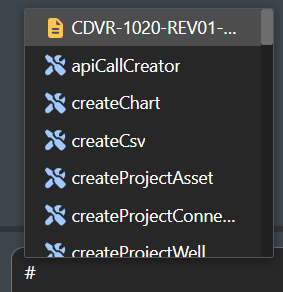
Using the keyboard arrows, the user can navigate through the list and confirm their selection by pressing Enter. The selected item will again appear as a chip in the input.
Model selector
Clicking the element will open a dropdown for selecting the AI model to use for the current question.

Agent mode selector
Clicking the element will open a dropdown for choosing the agent execution mode:

The following modes are available:
- Quick - Standard agent mode, fast and efficient for most tasks.
- Enhanced - Supervisor agent mode, evaluates progress and re-plans to improve accuracy.
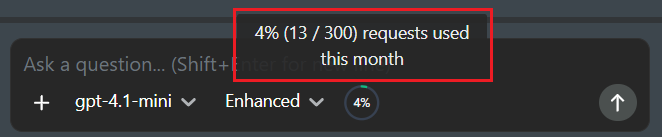
Monthly usage indicator
The circular progress indicator shows the current usage percentage for the user.

The color changes based on usage: green (under 60%), amber (60–80%), red (over 80%).
Hovering over the indicator will show the current number of requests used for the month:
Send or Cancel request
If no text is entered in the input field, the button will be visible in it's default state:

The button has two states based on the current action:
 - Once text is entered in the input field, the button can be used to send the question to the AI assistant.
 - While the AI is processing a request, the send button changes to a stop button. Click it to cancel the current request.
Messaging
The user's question is displayed as a text bubble on the right side of the screen.
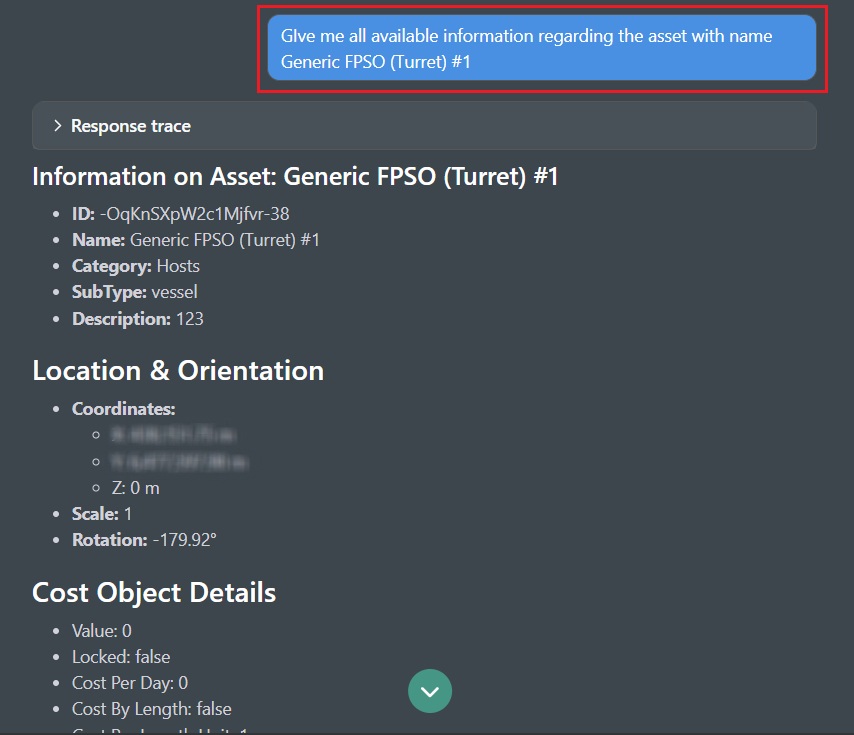
The assistant's response is displayed on the left side and includes:
- Response trace - A collapsible section showing the AI's internal processing steps.
- Answer - The formatted response (once ready) rendered as Markdown.
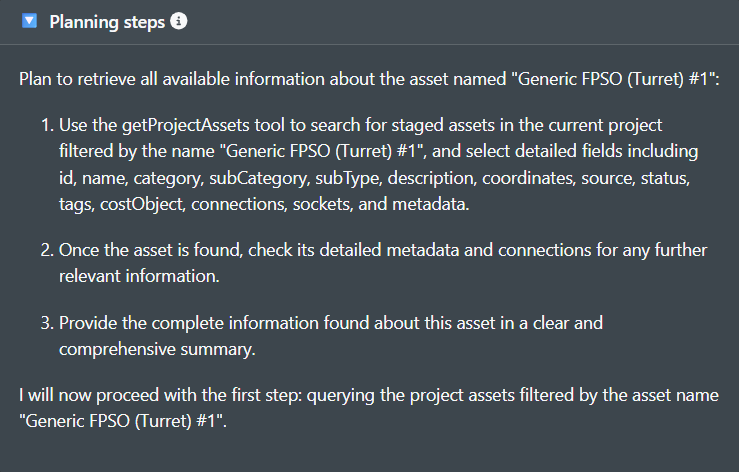
Response trace
During processing, the response trace shows the current step with an animated status indicator.
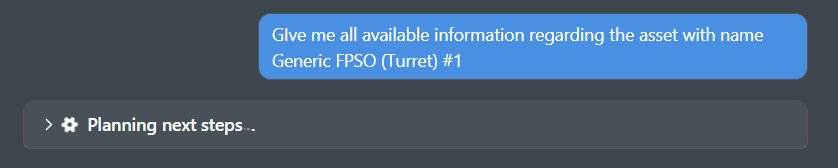
The following steps may appear:
- Thinking - The AI is beginning to process the request
- Running prompt guard - Security check on the input
- Planning next steps - Creating an execution plan
- Processing request - Executing tool calls and gathering data
- Evaluating results - Assessing the quality of results (Enhanced mode only)
- Generating response - Creating the final answer
After the response is complete, clicking the response trace expands it to show all executed steps.
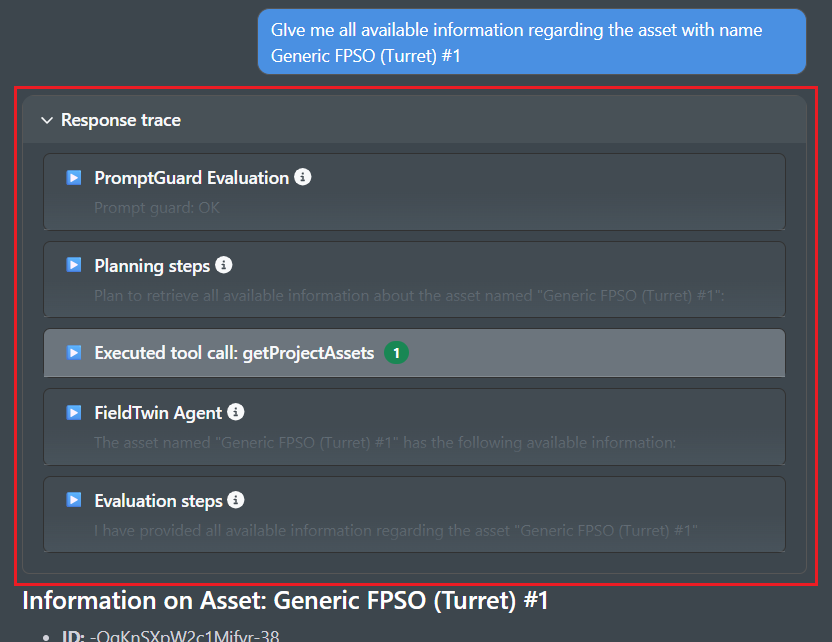
Each 'thinking' step of the assistant is shown as a collapsible card with the operation name and contains the actual 'thought' process.
Post-response actions
After a response is complete, a set of buttons appear at the end of each reply:

The buttons allow the following actions to be preformed (left to right)
- Copy - Copies the response text to the clipboard.
- Retry - Re-asks the last question (only available on the last message).
- Feedback - Submit a thumbs-up or thumbs-down rating.
- Info - Tooltip showing the timestamp, response time and token count.
If the answer of the assistant was not helpful, and a negative Feedback is given by the user, the following dialog will appear where an optional improvement suggestion can be added:
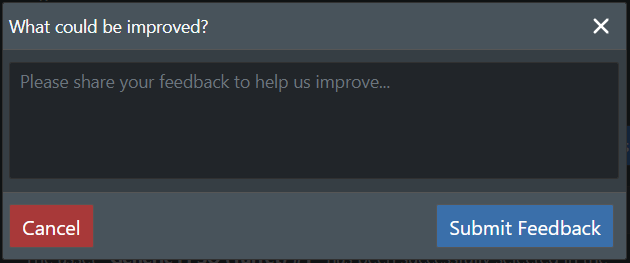
The modal has the following options:
- Cancel - Disregards the negative feedback selection.
- Submit Feedback - Saves the feedback, and the suggestion (if entered).
Note: When the AI is processing a question, the response trace as well as the responses are streamed in real-time. Tokens also appear progressively as the assistant generates the answer.
Using FieldTwin Intelligence
Questions are written in plain natural language — no special commands or syntax are required.
Formulating effective questions
Be specific Include the exact name of the objects you are asking about. The more precise the question, the more accurate the response:
- Use:
"Show me all assets with control module connected to the Umbilical 45" - Rather than:
"Show me assets"
Use quotes for object names When referencing a specific asset, connection, or other project object, wrap its name in quotes to help the AI locate it precisely:
- Use:
"Generic SDU 6 slot #1"(with quotes) - Rather than:
Generic SDUorSDU 6
Combine multiple operations The assistant can handle multi-step requests within a single query:
- "Can you list all oil production lines connected to 'Manifold 4-Slot Horizontal #5' and then update working pressure of those to 7500psi?"
Leveraging different data sources
Project Data Queries Ask about your current project's assets, connections, wells, shapes, and layers:
- "Show me all PLET assets with maximum design pressure set"
- "Calculate length of all umbilical connections"
- "Find all assets with control modules"
Guides Search FieldTwin's user documentation and visual guides:
- "Can you check in guides how to connect a well to its template in Olga? Also provide images"
- "What can you say about excel reporting?"
- "How do I use the iTwin integration?"
Uploaded documents Reference project-specific or account-level uploaded files:
- "Find any umbilicals that don't meet the 'Overall Heat Transfer Coefficient' requirements in the project uploaded specification"
- "Can you check in uploaded documents for Subsea Connections to FPSO steps for installation procedure?"
API documentation Get technical information about FieldTwin's API:
- "How do I create a staged asset using the API?"
- "What parameters are required for connection creation?"
Rich content
The AI assistant can generate various types of rich content, not just beyond plain text.
Charts
Interactive charts are able to be generated using Plotly.js:
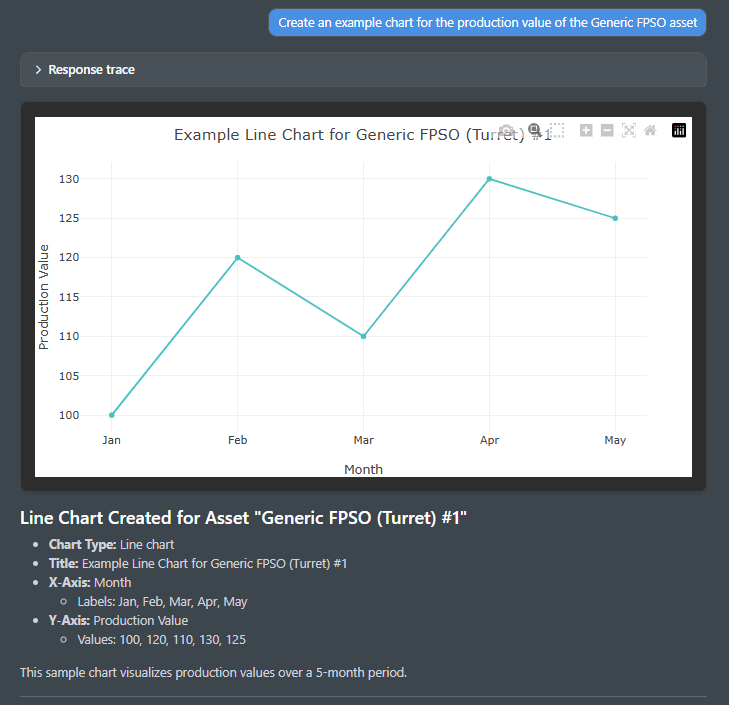
Some of the supported charts are: Bar, Line, Pie, Scatter
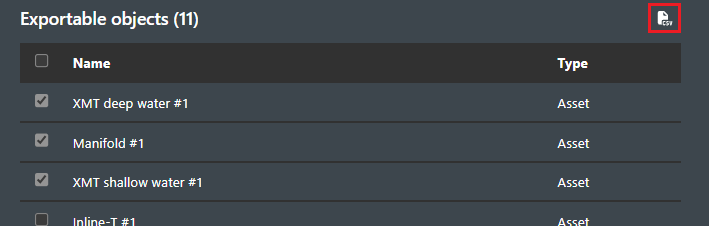
Object lists
Selectable tables of FieldTwin project objects (assets, connections, wells, shapes, layers etc).
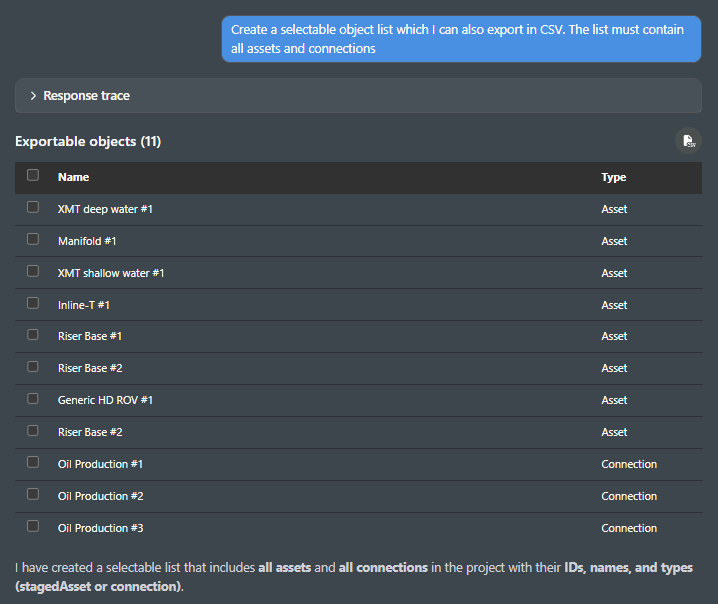
The table consists of two columns:
- Name - The name of the asset. Clicking on the asset name will also find and focus it within the Viewport.
- Type - The type of the listed asset.
Selected rows can also be exported as CSV directly, using the button located at the top right of the table:
Human review
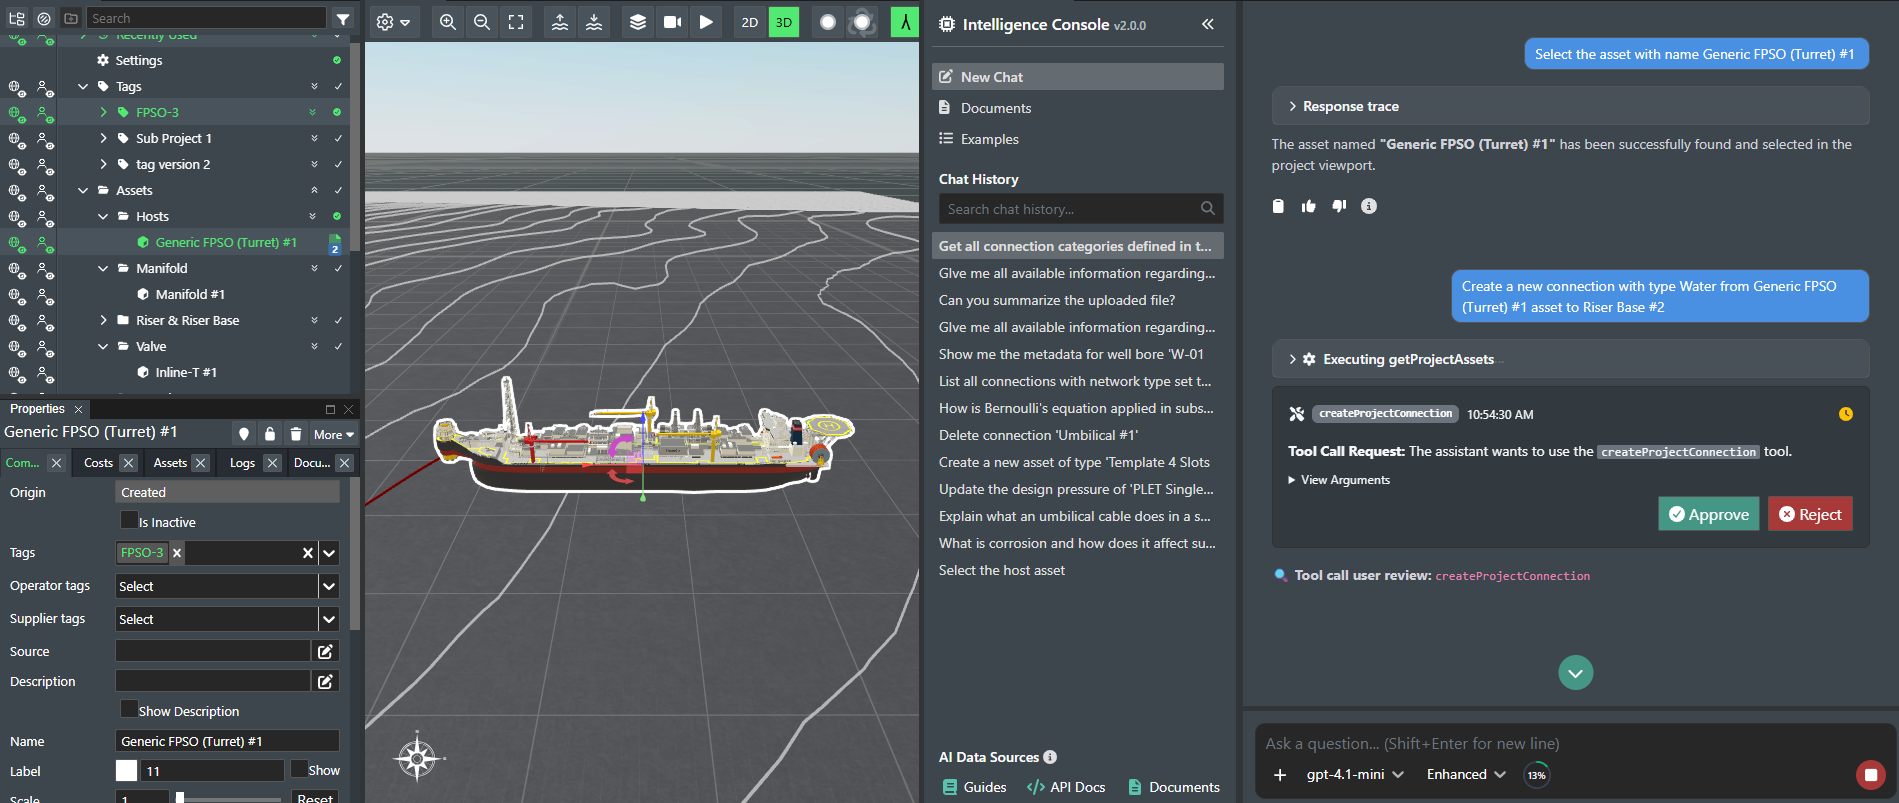
When the AI assistant wants to perform a write operation (creating, updating or deleting project data), it requires user approval before proceeding.
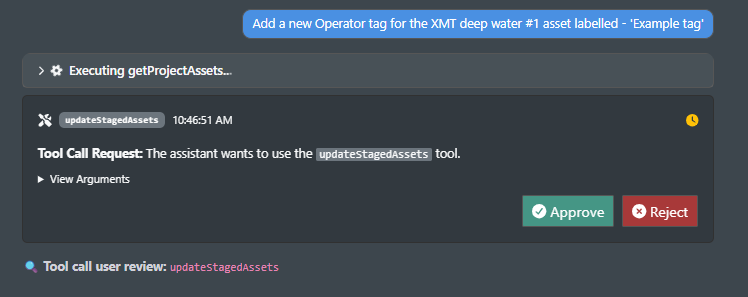
A review card appears showing:
- The tool name the assistant wants to use.
- The arguments that will be passed to the tool (expandable).
- Approve and Reject buttons.
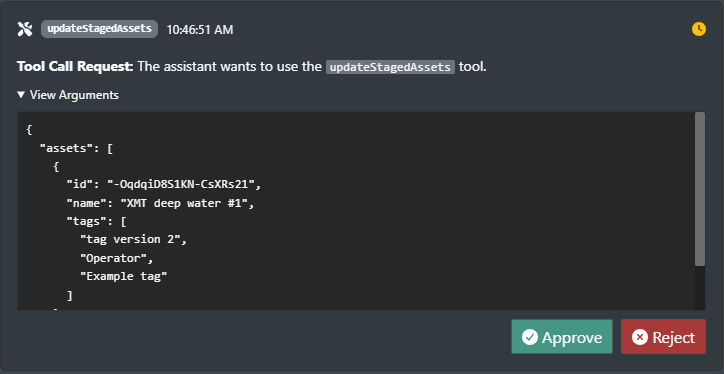
Clicking "Approve" will allow the operation to be preformed, while clicking on "Reject" will deny it.
Note: If no action is taken within 5 minutes, the operation is automatically rejected.
LLM retry
If an AI processing step encounters an error, a retry card is displayed.
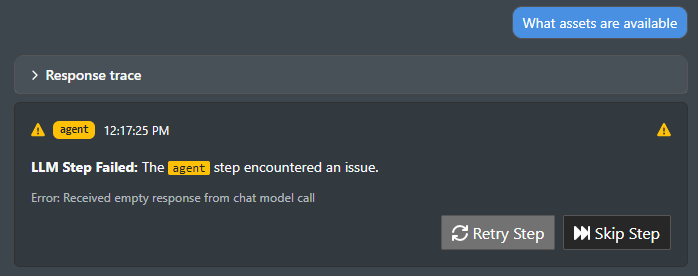
The card shows the step that failed and the error message. Two options are available:
- Retry Step - Re-runs the failed step.
- Skip Step - Skips the failed step and continues with the remaining steps.
API call creator
Note: This feature is intended for developers who need to interact with the FieldTwin API programmatically.
The AI assistant can generate an interactive API panel directly in the chat:
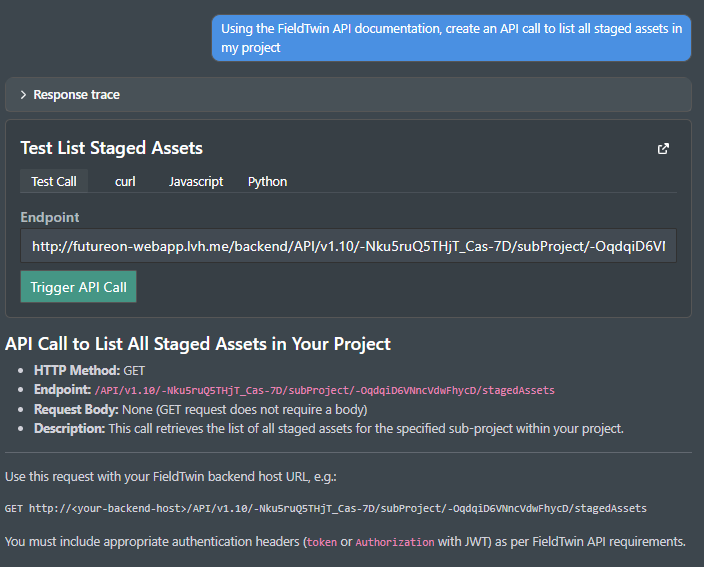
Four tabs for working with the generated API call are available:
- Test Call - Execute the API call directly from the chat and inspect the raw JSON response.
- cURL - A ready-to-use cURL command that can be copied and run from the terminal.
- JavaScript - A Fetch-based JavaScript snippet for use in web or Node.js applications.
- Python - A Requests-based Python snippet for use in scripts or backend services.
This allows developers to inspect, test, and integrate FieldTwin API requests without leaving the interface.
The information from each tab can be copied using this button, located on the right:
![]()
The full API documentation can also be accessed by clicking the  button located at top right of the header.
Security
An overview on FieldTwin Intelligence when it comes to overall security, information management, data storage and handling and compliance with the EU AI act and compliance with ISO 42001 can be found here Security FAQ
